
Cloud | Google Cloud Platform
How to deploy PrivateBin on Google Cloud Run and Google Cloud Storage 
Mark van Holsteijn 12 Sep, 2021


We believe that using the cloud should not compromise on your productivity. In this blog post, we show how you can develop locally, while running your Dask workload in the cloud. You enjoy the comfort of you own IDE and local version control, while letting Google Kubernetes Engine (GKE) do the heavy lifting for you. You won’t even notice it.
Dask combines a rich pandas-like API with the scalability of Spark. For data scientists, this means fast prototyping and data crunching without worrying about the data not fitting in the memory of your local machine. Using Dask, you can also scale machine libraries like scikit-learn, to distribute heavy training and cross-validation tasks.
Our setup is different from the official one, in which you have to develop on the cluster. This means that you run an online IDE (like Jupyter{Hub, Lab}) and clone your code on the cluster. You’ll have to keep your cluster alive at all times to save the state of your project. Our setup circumvents that problem.
The blog post requires both gcloud and kubectl. Run gcloud auth list to check if you are authenticated with the right account and use kubectl --version to make sure the command-line tool works. We used Kubernetes version 1.19.4 for this blog post.
This manual work best if you start with a new Google Cloud project with default networking. Once you created your project make sure that you set your project as a default in your gcloud config:
gcloud config set project <<YOUR PROJECT ID>>Also make sure that the GKE API is enabled. You do this via the console or by doing:
gcloud services enable container.googleapis.comCreate a Kubernetes cluster as follows (don’t forget to replace <<YOUR-IPV4-IP-HERE>> by your IP address):
gcloud container clusters create dask-cluster
  --create-subnetwork name=dask-cluster
  --num-nodes 3
  --region europe-west4
  --machine-type n1-standard-2
  --node-locations europe-west4-c
  --enable-master-authorized-networks
  --master-authorized-networks <<YOUR-IPV4-IP-HERE>>/32
  --enable-ip-alias
  --enable-private-nodes
  --master-ipv4-cidr 172.16.0.0/28
This creates a private Kubernetes cluster with a public master endpoint. This allows you to connect to the Kubernetes master and use kubectl to interact with the cluster.
Note: it is possible to make your cluster more secure by disabling client access to the public endpoint, however for the goal of this blog post we omit these steps.
After the cluster has been created, pull the cluster credentials to enable kubectl to connect to it:
gcloud container clusters get-credentials dask-cluster
  --zone europe-west4
If all went well, you’ll be able to list the nodes in your Kubernetes cluster:
kubectl get nodesWhich gives you something along the lines of:
NAME                   STATUS   ROLES    AGE     VERSION
gke-dask-cluster-...   Ready    <none>   2m12s   v1.16.15-gke.4300
gke-dask-cluster-...   Ready    <none>   2m15s   v1.16.15-gke.4300
gke-dask-cluster-... Ready <none> 28m v1.16.15-gke.4300 Since you run a private Kubernetes cluster, the nodes are not connected to the internet. Luckily in in Google Cloud, setting up a Cloud NAT to enable internet access in our private cloud is extremely simple. You create a Cloud Router:
gcloud compute routers create nat-router
  --network default
  --region europe-west4
and then create a Cloud NAT:
gcloud compute routers nats create nat-config
  --router-region europe-west4
  --router nat-router
  --nat-all-subnet-ip-ranges
--auto-allocate-nat-external-ipsOn your local device, make a virtual environment with Python 3.8.0 and install the following dependencies
pip install dask'[complete]'==2020.12.0
  dask-kubernetes==0.11.0
  jupyter==1.0.0
  numpy==1.18.1
  s3fs==0.5.2
The scheduler for Dask runs remotely on GKE. To map its address to a local IP, you append /etc/hosts by executing the following command:
echo '127.0.0.1 dask-cluster.default' | sudo tee -a /etc/hostsThis ensures that you can resolve the cluster address to localhost (although the cluster actually runs on GKE, we will make the connection available through a tunnel).
You are now ready to run Dask on GKE from your local device.
Now that you have a GKE cluster running, you are ready for the more obscure part: provisioning a Dask cluster dynamically from a Jupyter Notebook environment.
First, template the worker specification in a YAML file:
# worker-spec.yml
kind: Pod
spec:
  restartPolicy: Never
  containers:
  - image: daskdev/dask:2020.12.0
    imagePullPolicy: IfNotPresent
    args: [dask-worker, --nthreads, 2, --no-dashboard, --memory-limit, 7GB, --death-timeout, 300]
    name: dask
    env:
      - name: EXTRA_PIP_PACKAGES
        value: s3fs
    resources:
      limits:
        cpu: 1
        memory: "7G"
      requests:
        cpu: 1
        memory: "4G"
Customize the workers based on your needs: take GPUs, TPUs, or high-memory workers as you see fit. Do make sure that the Dask version (2020.12.0) is identical to your local Dask version.
Open a Jupyter Notebook and run the following in a cell:
import dask
from dask_kubernetes import KubeCluster

cluster = KubeCluster.from_yaml('./worker-spec.yml', deploy_mode='remote', name='dask-cluster')
When it runs, open a new terminal and execute the following command:
kubectl port-forward service/dask-cluster 8786:8786 --pod-running-timeout=5m0sIf you catch “Error from server (NotFound): services "dask-cluster" not found”, you were too fast. Just re-execute the command until it succeeds.
If you want to re-spawn the Dask cluster (because something went wrong), make sure you first remove the old one by removing the Kubernetes service (kubectl delete service dask-cluster) and all pods (kubectl delete pods --all).
If all went well, the cell in your Jupyter Notebook should terminate (meaning that [*] will change into [1]). Now, you can see the scheduler pod running in your terminal:
kubectl get pods -n defaultYou connect to the dashboard of the Dask scheduler by opening up yet another terminal and creating a tunnel:
kubectl port-forward service/dask-cluster 8787:8787 --pod-running-timeout=5m0sIn your browser, you can now access your Dask dashboard at http://localhost:8787:
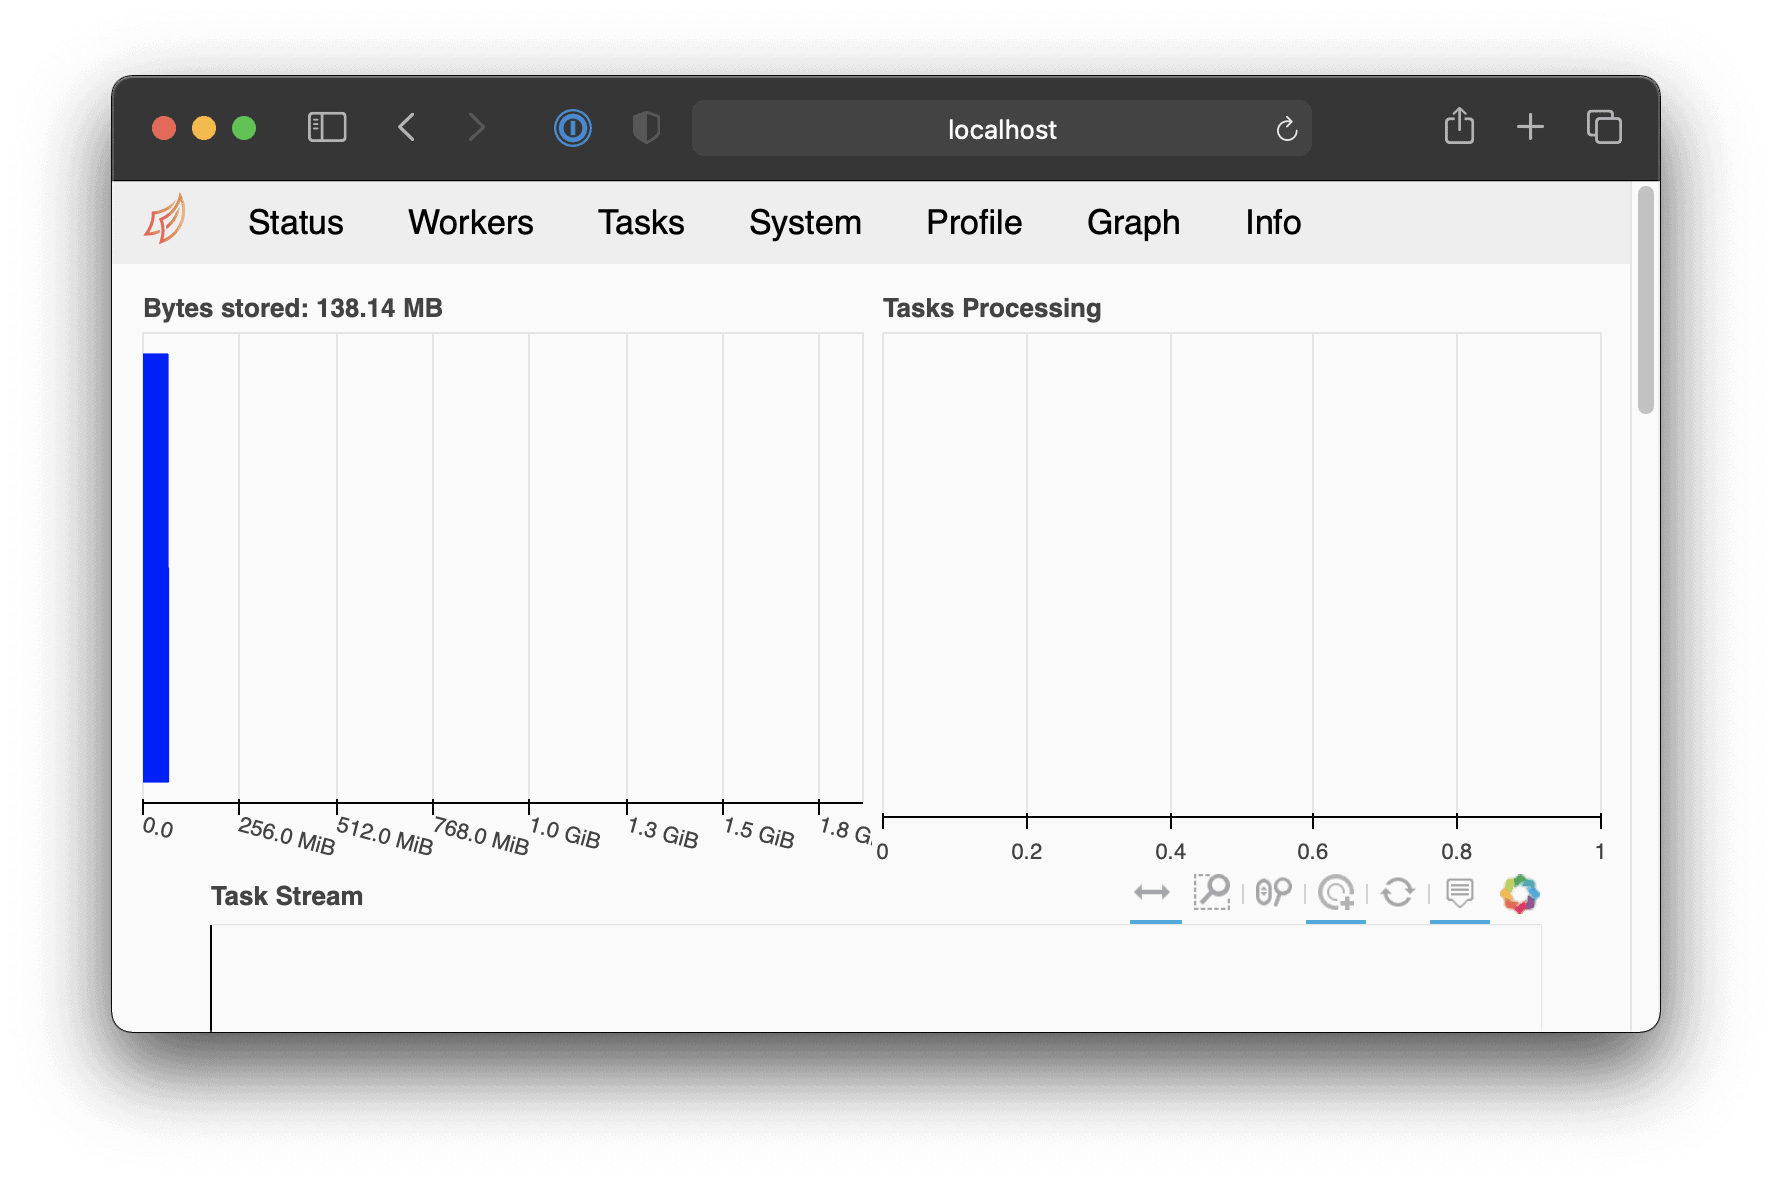
So what actually happens when creating the Dask cluster and running the kubectl port-forward command? When you create a KubeCluster, Dask creates a pod containing the Dask distributed scheduler. It also creates a kubernetes service listening on port 8786 (worker communication) and 8787 (Dask dashboard). When you connect to this service you are routed to the Dask scheduler pod.
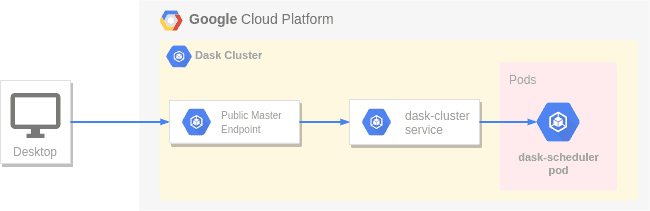
Kubernetes offers the functionality to setup a tunnel directly to a pod or service via the master endpoint over http(s). We use this functionality to connect to the Dask scheduler from our local environment. This is shown in the simplified diagram underneath. When invoking kubectl port-forward service/dask-cluster 8786:8786 , kubectl connects to the GKE master endpoint, which routes the traffic to the GKE dask-cluster service. This service in term routes the traffic to the Dask scheduler pod. Thus you can connect from your local notebook to the Dask scheduler over a secure connection.
In the next step you’ll add workers to your cluster (under “Workers” in the Dask dashboard, you’ll see there are still none).
You can now add workers to the cluster by using the scale method:
cluster.scale(2)You’ll now see two workers running at http://localhost:8787/workers:

Now that we have a cluster with workers we can start executing tasks. Initiate a client:
from dask.distributed import Client
client = Client(cluster)
You are now ready to run your first piece of Dask code:
import dask.array as da

# Create a large array and calculate the mean
array = da.ones((1000, 1000, 1000))
print(array.mean().compute())  # Should print 1.0
To really put the cluster to the test, load the infamous New York Taxi dataset for 2015 onto your cluster as follows:
import dask.dataframe as dd
import pandas as pd

taxi_data = dd.read_csv(
    "s3://dask-data/nyc-taxi/2015/yellow_tripdata_2015-*.csv",
    parse_dates=["tpep_pickup_datetime", "tpep_dropoff_datetime"],
    storage_options={'anon': True, 'use_ssl': False}
)

print(f"row count: {taxi_data.shape[0].compute()}")
# 146,112,989 rows

print(f"average trip distance: {taxi_data['trip_distance'].mean().compute()}")
# 13.1 miles

distance_per_day = (
    taxi_data
    .assign(
        day=ddf["tpep_pickup_datetime"].dt.day,
        month=ddf["tpep_pickup_datetime"].dt.month,
        year=ddf["tpep_pickup_datetime"].dt.year,
    )
    .groupby(["day", "month", "year"])["trip_distance"]
    .sum().compute()
)

busiest_day = distance_per_day.idxmax()
distance = distance_per_day.max()

print(f"Busiest day of 2015: {'-'.join(map(str, busiest_day))} ({distance:.0f} taxi miles)")
# Busiest day of 2015: 25-11-2015 (200026475 taxi miles)
when running the above snippet, you’ll see the load of the cluster increase in the dashboard:
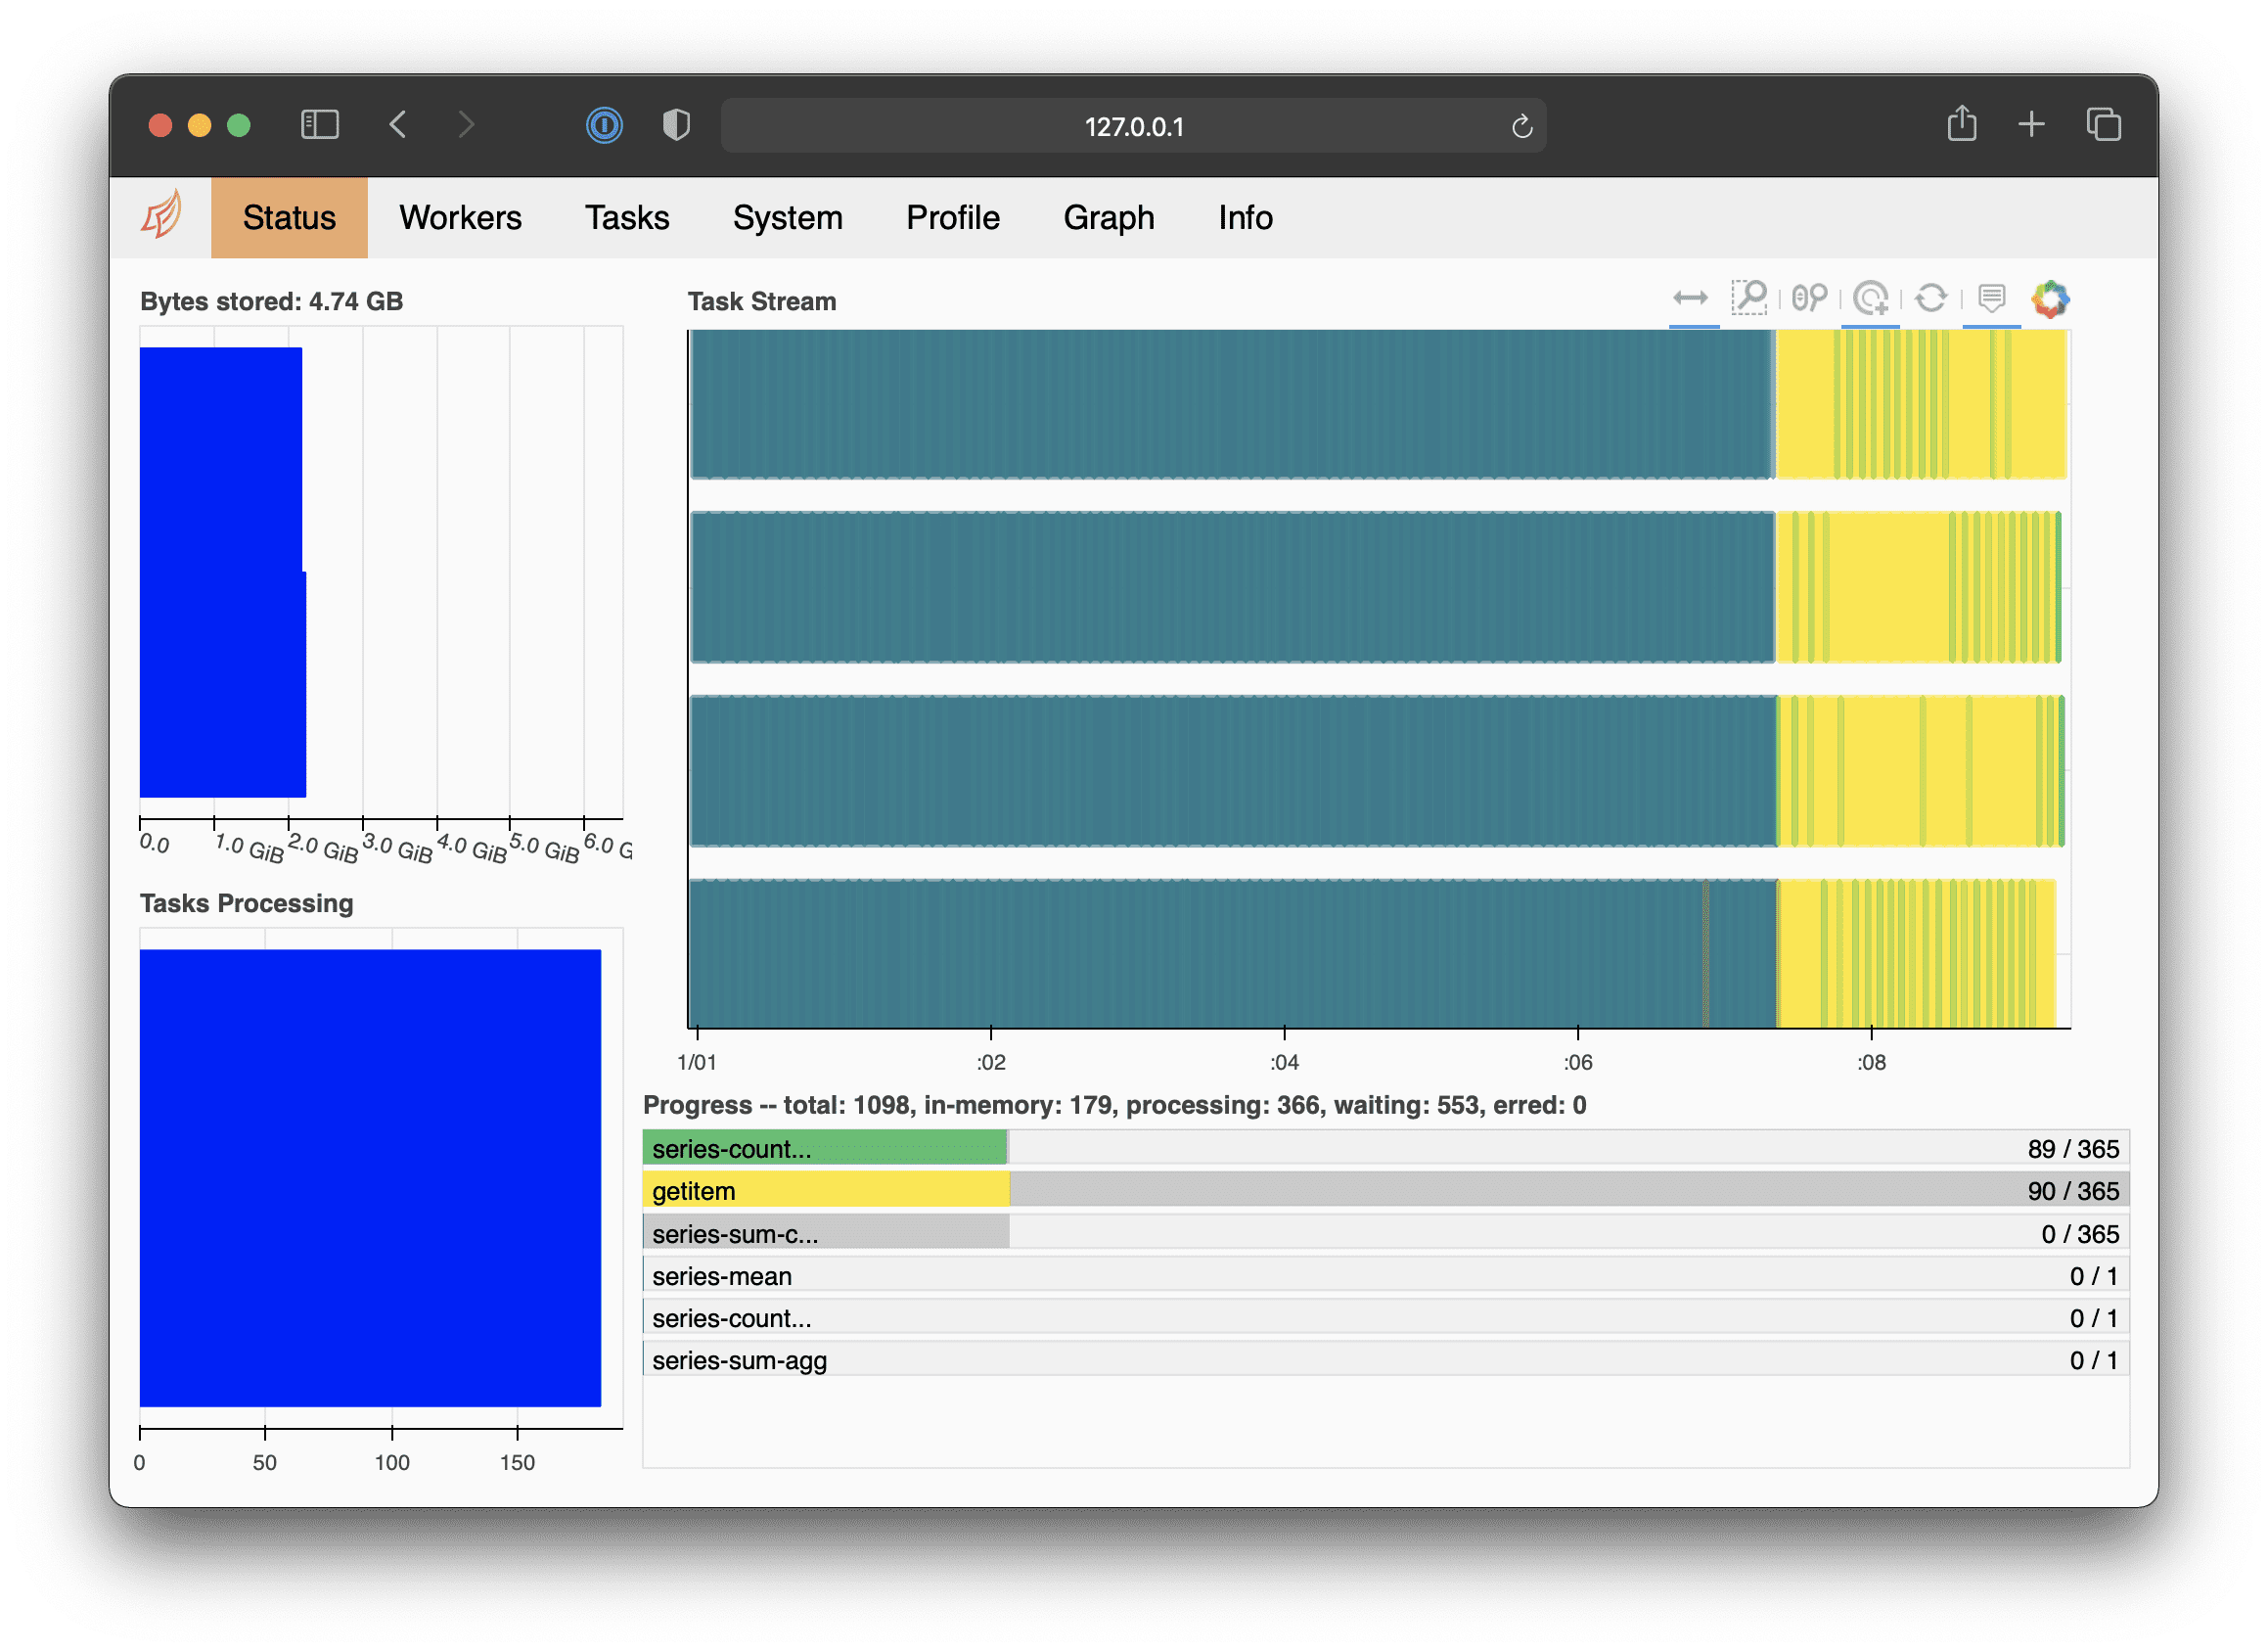
If you scale up to more than two workers, you run out of resources, because the cluster only has three nodes (and one is reserved for the scheduler). You solve this by enabling autoscaling on your GKE node pool:
gcloud beta container clusters update dask-cluster
  --region europe-west4
  --min-nodes 0
  --max-nodes 6
  --autoscaling-profile optimize-utilization
Now, you can scale up to more than two workers:
cluster.scale(4)GKE will notice that there are insufficient CPUs available and will add two more VMs:
kubectl get nodesgke-dask-cluster-... Ready <none> 2m12s v1.16.15-gke.4300
gke-dask-cluster-... Ready <none> 2m15s v1.16.15-gke.4300
gke-dask-cluster-... Ready <none> 28m v1.16.15-gke.4300
gke-dask-cluster-... Ready <none> 28m v1.16.15-gke.4300
gke-dask-cluster-... Ready <none> 28m v1.16.15-gke.4300To scale down, you simply scale to zero (downscaling typically takes a few minutes):
cluster.scale(0)Dask also supports adaptive clusters, which scales up and down depending on the workload. This means that you never have to set the number of workers manually. To make the cluster adaptive, you only set the minimum and maximum workers:
cluster.adapt(minimum=0, maximum=5) # scale between 0 and 5 workersLet’s put the adaptive clustering to the test and run a large job:
# Create a large array and calculate the mean
array = da.ones((10000, 10000, 10000))
print(array.mean().compute())  # Should print 1.0
The job takes longer to start, since GKE first increases the node pool before the workers are available for Dask. However, this process is fully automatic and after a few minutes the job should execute.
After the job finishes, Dask terminates the workers and GKE removes the VMs from the pool.
You delete your Dask cluster by invoking the shutdown() command:
client.shutdown()This deletes all the pods created by Dask and the Kubernetes service that was created specifically for this cluster. To check that everything terminated, run kubectl get services and kubectl get pods. To tear down the cluster, run gcloud container clusters delete dask-cluster --region europe-west4.
If you want to keep your cluster online but incure minimal cost you can set your nodepool size to 0. Normally running GKE without nodes still incures costs due to management fee of 0.10$ per hour, however, the management fees for your first cluster are waived. Thus if you want to keep your cluster online but pay minimal cost you can decrease your node pool size to 0 machines by executing:
gcloud container clusters resize dask-cluster
    --region europe-west4
    --num-nodes 0
If you want to run a scheduler again, make sure you add at least one node back.
